The Import Curricula wizard allows you to create a curricula in Excel and quickly import it into the LMS. This function can be extremely useful for the initial set up of the Course Catalog or for any large initiative that requires multiple new curricula.
The curriculum import can be used to create Catalog or Mapping Curricula. Import cannot be used to create Certificates.
The curriculum import allows you to select the resources that will be part of the curriculum and then organize them in the order that they should appear within the curriculum. Only one curriculum can be uploaded at a time. A separate import spreadsheet must be created for each curriculum.
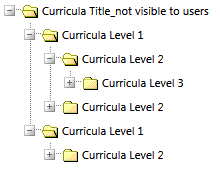
Before creating the import you should map out the various levels that will be part of your curriculum and then decide which courses should appear in each level. When organizing the courses in the template, you will need to list each of the preceding curriculum levels for each course. For example, if a course is part of Level 1, then only the Level 1 folder title needs to be part of the import, but if a course should be listed under Level 3, then Levels 1, 2, and 3 will need to be listed on the import. The picture below shows how there can be multiple instances of each level.
If you are adding resources to an existing curriculum, you can use existing curriculum levels. Just be sure to type the names of the curriculum levels exactly as they appear in the LMS so that the system knows to add them to the existing structure.
The information in the curriculum import should be organized in Excel in the following format.
| Column | Heading | Description |
|---|---|---|
| A | Resource ID | Resource ID of the resource that is a component of the curriculum. Required – Column A, B, or C must have data. Data should only be entered in one of these 3 columns. |
| B | Course Title | Course Title of the resource that is a component of the curriculum. Best Practice Tip – Whenever possible use the Resource ID or Course Number. The Course Title must be entered exactly as it appears in the LMS or the system will not recognize it. Required – Column A, B, or C must have data. Data should only be entered in one of these 3 columns. |
| C | Course Number | Course Number of the resource that is a component of the curriculum. Required – Column A, B, or C must have data. Data should only be entered in one of these 3 columns. |
| D | Requirement Type | This field is used to set the requirement on the specific resource.
|
| E | Curricula Level 1 | Required – Enter the name of the top level folder for this curriculum. |
| F | Curricula Level 2 | Optional – Enter the name of the second curriculum level, if that is the level/folder this resource will be in. |
| G | Curricula Level 3 | Optional – Enter the name of the third curriculum level, if that is the level/folder this resource will be in. |
| H | Curricula Level 4 | Optional – Enter the name of the fourth curriculum level, if that is the level/folder this resource will be in. |
| I | Curricula Level 5 | Optional – Enter the name of the fifth curriculum level, if that is the level/folder this resource will be in. |
| J | Curricula Level 6 | Optional – Enter the name of the sixth curriculum level, if that is the level/folder this resource will be in. |
| K | Curricula Level 7 | Optional – Enter the name of the seventh curriculum level, if that is the level/folder this resource will be in. |
| L | Curricula Level 8 | Optional – Enter the name of the eighth curriculum level, if that is the level/folder this resource will be in. |
To import the curriculum, go to Tools > Import Curricula Wizard and select the first option: Create a new curricula.
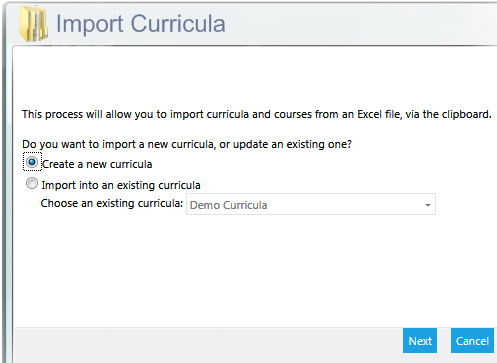
Click Next and enter the title of the curriculum. This is the title that will appear on the curriculum Overview screens. This title is not visible to end users.
Enter a description for the curriculum and select which type of curriculum should be created. The two options are Catalog Curricula or Mapping Curricula.
On the next screen, paste the contents of the curriculum spreadsheet into the space provided. If the header rows are included in the contents, be sure that the checkbox to indicate this is selected. The box is checked by default.
If the imported data is correct, the system will show a status of OK. If incorrect data was entered, the system will display an error message. If necessary, click Previous to return to the previous screen and correct any incorrect data. When all of the data is correct, click Next to continue.
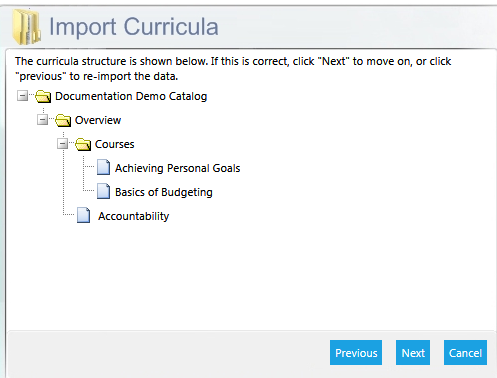
The LMS will display the structure of the uploaded curriculum and the courses associated with each level. If the structure is not listed the way you intended, click Previous to go back to the previous screens and re-import the data.
Once the curriculum has been created, go to the appropriate screen (Maintain Course Catalog or Maintain Mapping Curricula) to activate the curriculum and set the audience.
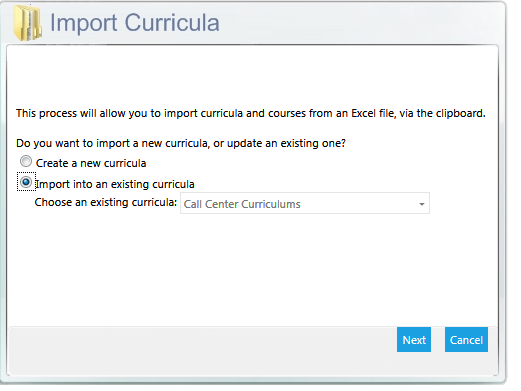
The curriculum wizard can also be used to add resources and levels to an existing curriculum.
To import the new curriculum content, go to Resources > Import Curricula Wizard and select the second option: Import into an existing curricula.
Follow the steps outlined above to complete the import.
Create, Modify, or Deactivate Curriculum
Define Audience Mapping for a Curriculum
Add or Modify Resources in a Mapping Curriculum