Since an assessment is a type of resource, the shell of the assessment is created the same as other resource types. From the Administrator's Console, go to Resources > Maintain Learning Resources and click New in the toolbar.
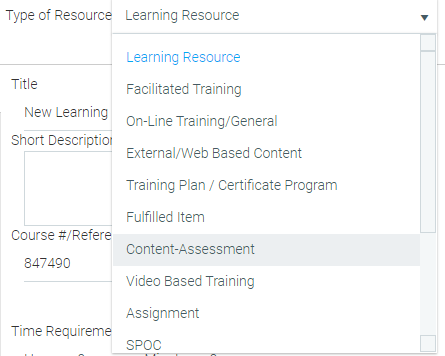
From the Type of Resource drop-down at the top right, select Content-Assessment.
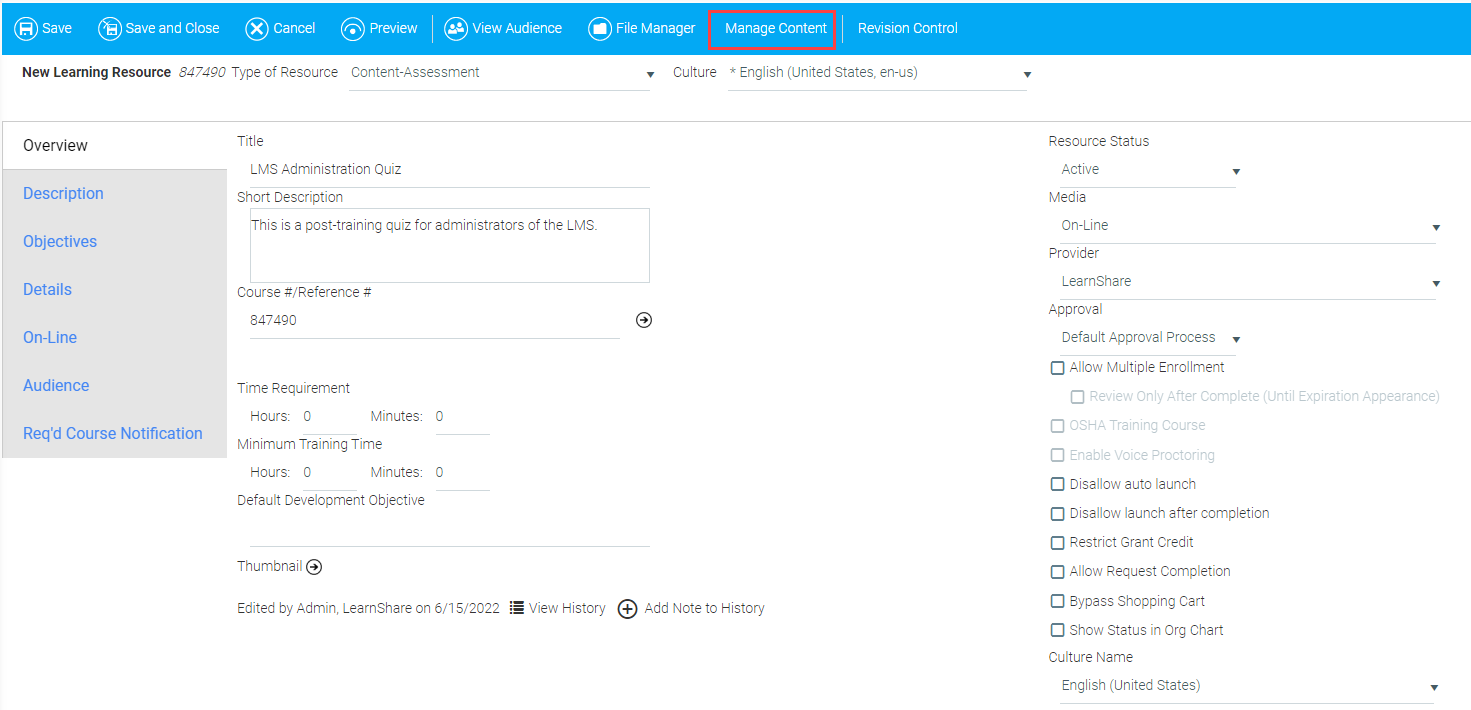
Complete the required resource tabs, such Audience, Notifications, etc. and then click the Manage Content button in the top toolbar to begin creating the actual assessment.

If you do not see the Manage Content button, verify that Content-Assessment is listed as the Type of Resource.
Before you begin to create the quiz, you need to set the quiz properties. Click the Quiz Properties button on the toolbar. The Properties screen will appear.
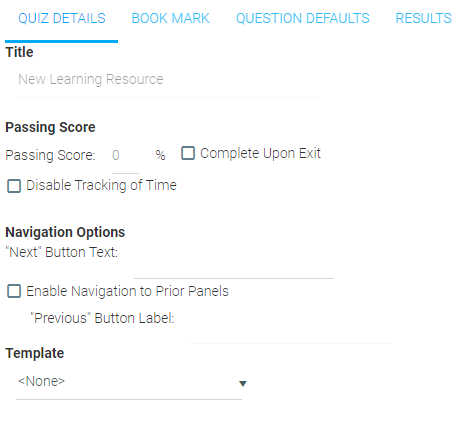
On the Quiz Details tab, fill in the following fields:
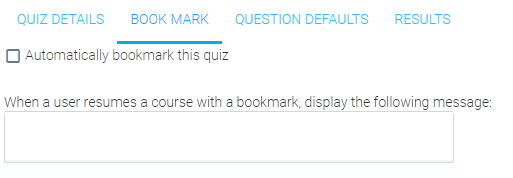
On the Book Mark tab, fill in the following field:
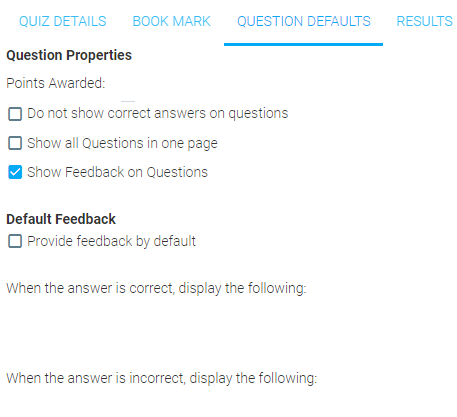
On the Question Defaults tab, fill in the following fields:
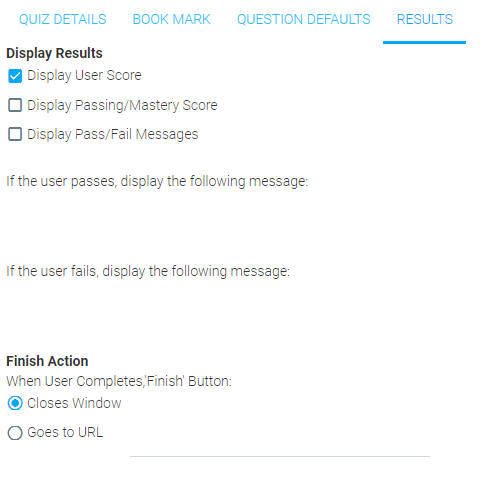
On the Results tab, fill in the following fields:
When you have completed all fields, click OK. This will take you back to the quiz overview screen.
If you wish to edit an assessment that already exists, go to Maintain Learning Resources and search for the selected assessment using the search tools on that screen. Once you have found the assessment, select it and click Edit in the toolbar.
Click on the Manage Content button in the resource toolbar to access the assessment.
Follow the steps above to edit the settings of the assessment.
When changes are made to an assessment, the changes will only be seen if an existing enrollee has not started the assessment yet.
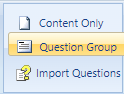
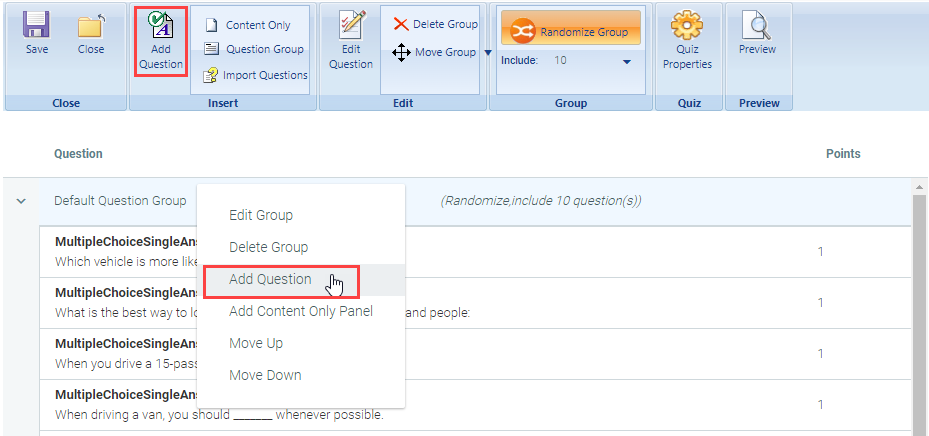
To add a new question group, go to Resources > Maintain LMS Assessments, find the assessment you wish to edit, and click the Edit button in the toolbar. Once you are editing the quiz, click Question Group, beside the Add Question button in the assessment editing toolbar.
A new group will be added to the quiz. To change the title of the group, right-click on the group and select Edit Group from the context menu or simply double-click on the group name.

In the Edit Group pop-up window, you will be able to change the default name of the group.

To add questions to a quiz, go to Resources > Maintain LMS Assessments, select the quiz you wish to edit, and click the Edit button in the toolbar. Click on the appropriate question group, then click Add Question on the toolbar of the editing window. You can also right-click on a question group and select Add Question from the pop-up menu.
The New Question pop-up window will appear.
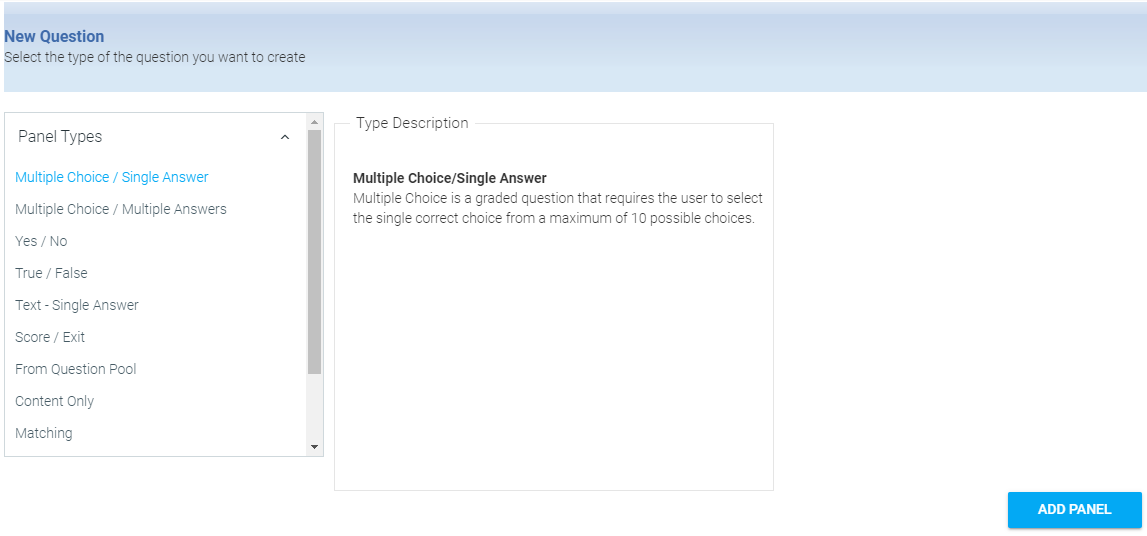
Select the type of panel you wish at add:
Click the Add Panel button on the lower right side of the screen. On the next screen, you will be able to fill in the details of the question you wish to add.
There are several ways to re-order the list of questions on a quiz. You can click on the title of the question and drag up or down, or you can right-click on the question and select Move Up or Move Down from the context menu.

You can also click on a question, select Move Question on the toolbar, then click Up or Down

You can change the order of question groups using the same steps.
Make sure you click Save before you close or move to another screen. Changes in question or question group order are not saved automatically.
To delete a question, either click on the question title to select it, then click Delete Question in the tool bar, or right click on the question and select Delete Question from the context menu.

You can use the same steps to delete a question group.
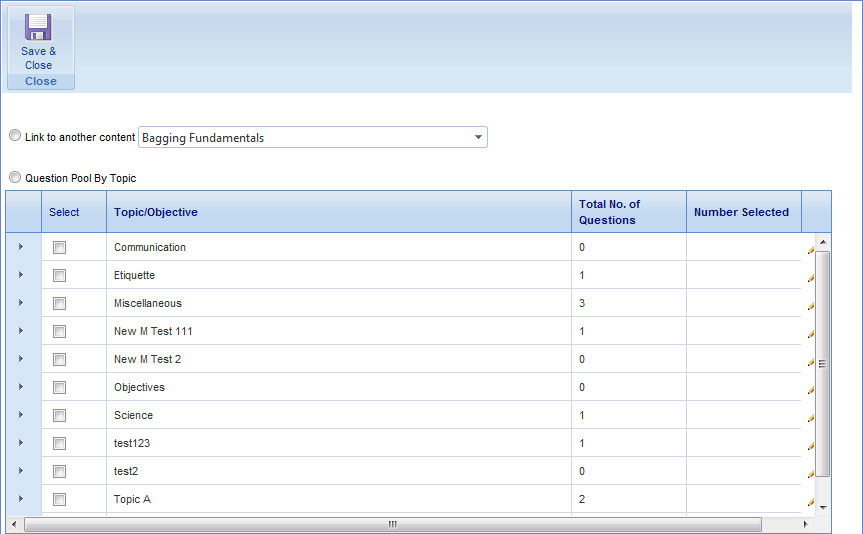
To add questions to an assessment from a question pool, follow the steps in Add a Question. On the Add Question screen, select From Question Pool and click Add Panel. The Question Pool dialog window will pop up.
To add content that is already linked to the original resource, select the Link to Another Content radio button. From the drop-down, select an existing quiz, save your selection, and close the window.
The linked quiz content will appear as a question labeled Module.

When users take your quiz and come to this panel, they will be redirected to the linked content.
If the module you have just linked to includes a Score/Exit panel, users will be exited from the course upon reaching this panel, even if there are other panels beyond it in the quiz containing the link.
To add individual questions from other content, select the Question Pool by Topic radio button. To add all the questions from a topic, select the check box next to that topic and click Save & Close.
To use a set number of questions from a topic, click the Edit button next to the Number Selected column, and type in the number of questions from each topic you wish to use. For example if you had typed "2", then two random questions from the checked topic will be used. The quantity in the Number Selected column should not be greater than the quantity in the Total No. of Questions column.
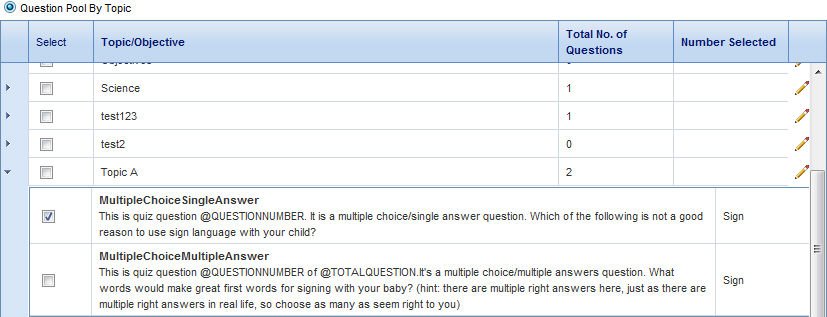
To add individual questions from a topic, click the arrow in the left column to expand the topic, and use the check boxes to select individual questions. When you have finished, click Save & Close.
To copy a question from another assessment into your quiz, rather than simply linking to it, click Import Question on the Add Question screen tool bar. The copied question is not linked to the original content. Changes made to the original question will not change the copied content.

On the Import Questions pop-up screen, click the Content drop-down and select an existing quiz. The questions from that quiz will appear in the Question list.

Use the check boxes at left to select the question(s) you wish to import. The pop-up screen will close and the added question will appear in your quiz's edit screen.
You can click the Edit Question button in the tool bar to change the question properties, apply a different points value, etc.
Use a content-only panel to give the user instructions, review text, or video before presenting related questions or to introduce a new set of questions. A content-only panel is not scored.
To add a Content Only question, go to Resources > Maintain LMS Assessments and search for the quiz you will be editing. Select the quiz and click the Edit button in the toolbar. In the quiz editing screen, select a question group and click the Add Question button from the toolbar.

In the Add Question screen, select Content Only, then click the Add Panel button.


On the pop-up screen, use the rich text tools to insert and format text, links, graphics, Flash media, video, etc.
Click the Question Properties button in the top toolbar to add the button label text, set feedback options, and designate a destination URL (if different from the next panel).
Select a topic in the Add to Topic drop-down in the top toolbar to add this panel to an existing topic, or type a new topic name into the New Topic field.
Use a matching panel to assess the user's ability to match paired values to each other.
To add a Matching question, go to Resources > Maintain LMS Assessments and search for the quiz you will be editing. Select the quiz and click the Edit button in the toolbar. In the quiz editing screen, select a question group and click the Add Question button from the toolbar.
On the Add Question screen, select Matching, then click Add Panel.

Type directions to the user in the Enter The Question text box. Use the pop-up rich text tools to format the text, if desired.
In the Enter The Choices section, enter up to ten values in the Choice text boxes on the left of the screen. Type the corresponding correct values in the Match text boxes. In this type of question, answers are shuffled by default. Note that when users view the question, they will click the drop-down next to each choice and select the letter of the matching answer in the right-side column.

Double click on the Set Feedback responses at the bottom of the screen to edit the response text that will appear after the user answers the question. You can also edit the point value here. Note that if you choose disable scoring, no points value will appear here.
Click Question Properties in the top toolbar to set the button text the user will see on this panel and to set a URL (if different from the next panel).
Click the Score drop-down in the top toolbar to enable or disable scoring.
Select a topic in the Add to Topic drop-down in the top toolbar to add this panel to an existing topic, or type a new topic name into the New Topic field.
Use a Multiple Choice / Multiple Answers panel when there is more than one correct answer to a question.
To add a Multiple Choice / Multiple Answers question, go to Resources > Maintain LMS Assessments and search for the quiz you will be editing. Select the quiz and click the Edit button in the toolbar. In the quiz editing screen, select a question group and click the Add Question button from the toolbar.
On the Add Question screen, click Multiple Choice / Multiple Answers and click the Add Panel button. On the resulting screen, notice that the selector beside each possible answer are check boxes, not radio buttons. You can set more than one to be correct.

Type the question in the Question text box, and type the answers in the Possible Answers text boxes. Use the check boxes to select which answers are correct.
You can change the order of the answer options by drag-and-drop, or right-click a line and select Move Up or Move Down. You can delete an option by right-clicking a line and selecting Delete from the content menu.
Click the Shuffle drop-down in the top toolbar to change the order of the answers each time the user accesses the quiz.

Click the Score drop-down in the top toolbar and choose By Answer if you wish to designate partial credit for partially correct answers.

Click the Question Properties button in the top toolbar to add the button label text, set feedback options, and designate a destination URL (if different from the next panel).
Select a topic in the Add to Topic drop-down in the top toolbar to add this panel to an existing topic, or type a new topic name into the New Topic field.
Use a Multiple Choice / Single Answer panel to provide users a range of answer options when only one is correct.
To add a Multiple Choice / Single Answer question, go to Resources > Maintain LMS Assessments and search for the quiz you will be editing. Select the quiz and click the Edit button in the toolbar. In the quiz editing screen, select a question group and click the Add Question button from the toolbar.
On the Add Question screen, click to select Multiple Choice / Single Answer and click the Add Panel button.

Type the question in the Question text box using the pop-up rich text tools to format the text.
Type the possible answers in the Possible Answers text boxes and select the radio button next to the correct answer.
Click the Question Properties button in the top toolbar to add the button label text, set feedback options, and designate a destination URL (if different from the next panel).
Click the Set Feedback drop-down in the top toolbar to select whether to provide feedback by question or by answer.
Click the Shuffle drop-down in the top toolbar to choose to change the order of the answers each time a user accesses the question.
Click the Score drop-down in the top toolbar and select By Answer to award partial credit for partially correct answers, if desired.

You can change the order of the answer options by drag-and-drop, or right-click a line and select Move Up or Move Down. You can delete an option by right-clicking a line and selecting Delete from the content menu.
Select a topic in the Add to Topic drop-down in the top toolbar to add this panel to an existing topic, or type a new topic name into the New Topic field.
With the Randomization option, you can randomize all of the questions in a selected group, or you can designate a set number of questions that need to be completed from the group. With these options, each user can be presented with different versions of the assessment.
To randomize a question group, go to Resources > Maintain LMS Assessments and search for the quiz you will be editing. Select the quiz and click the Edit button in the toolbar. In the quiz editing screen, select a question group and click the Randomize Group button in the toolbar.
By default, all questions in a group will be presented in randomized order. In order to select a particular number of random questions to be presented, click the Include drop-down below the Randomize Group button.

Select the number of questions you wish each user to see from this question group. After you do this, the group header will indicate whether the group is randomized and how many questions are included. The questions from all other groups will appear in the same order in which they were created.

Use a Score and Exit panel to contain final directions to the user on viewing their score and exiting the assessment.
To add a Score and Exit question, go to Resources > Maintain LMS Assessments and search for the quiz you will be editing. Select the quiz and click the Edit button in the toolbar. In the quiz editing screen, select a question group and click the Add Question button from the toolbar.
On the Add Question screen, select Score / Exit and click the Add Panel button.
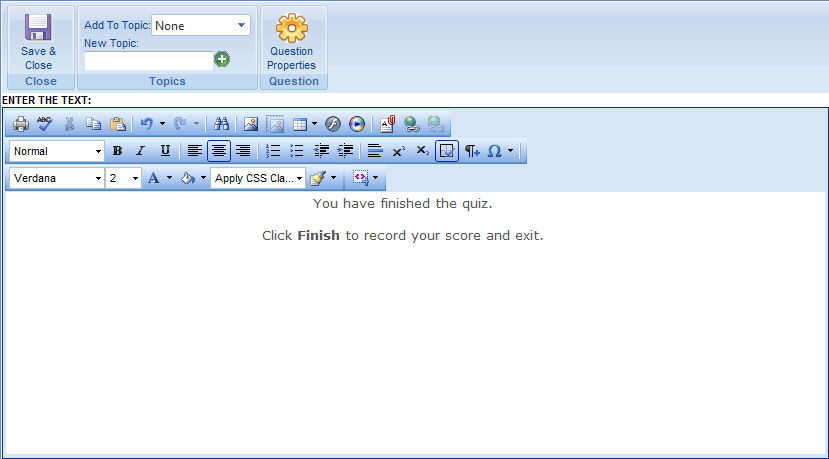
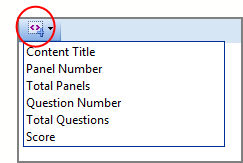
Type your final directions into the text box. TIP: Use the Insert Code Snippet button on the Rich Text toolbar to add dynamic fields like Score and Total Questions:
Click the Question Properties button in the top toolbar to add the button label text, set feedback options, and designate a destination URL (if different from the next panel).
Select a topic in the Add to Topic drop-down in the top toolbar to add this panel to an existing topic, or type a new topic name into the New Topic field.
Use a Text - Single Answer panel for questions that have specific word or phrase answers that users should type in.
To add a Text - Single Answer question, go to Resources > Maintain LMS Assessments and search for the quiz you will be editing. Select the quiz and click the Edit button in the toolbar. In the quiz editing screen, select a question group and click the Add Question button from the toolbar.
On the Add Question screen, select Text - Single Answer and click the Add Panel button.

Type the question in the Question text box using the pop-up rich text tools to format the text, add graphics and media, etc. Type up to ten possible correct answers in the Possible Answers text boxes. If the acceptable answers fields are left empty, then the text box will behave as a simple input box and the question will not be scored. This is useful for unscored reflection questions.
Click the Feedback drop-down in the top toolbar and choose By Question or None, depending on whether you wish to provide the user instant feedback after they answer the question or not.

If you wish to edit the default feedback phrases and points value for this question, double-click on the feedback phrases at the bottom of the screen.

Click the Question Properties button in the top toolbar to add the button label text, set feedback options, and designate a destination URL (if different from the next panel).
Select a topic in the Add to Topic drop-down in the top toolbar to add this panel to an existing topic, or type a new topic name into the New Topic field.
Use a True/False question panel for questions the user must distinguish as either true or false.
To add a True/False question, go to Resources > Maintain LMS Assessments and search for the quiz you will be editing. Select the quiz and click the Edit button in the toolbar. In the quiz editing screen, select a question group and click the Add Question button from the toolbar.
On the Add Question screen, select True/False and click the Add Panel button.
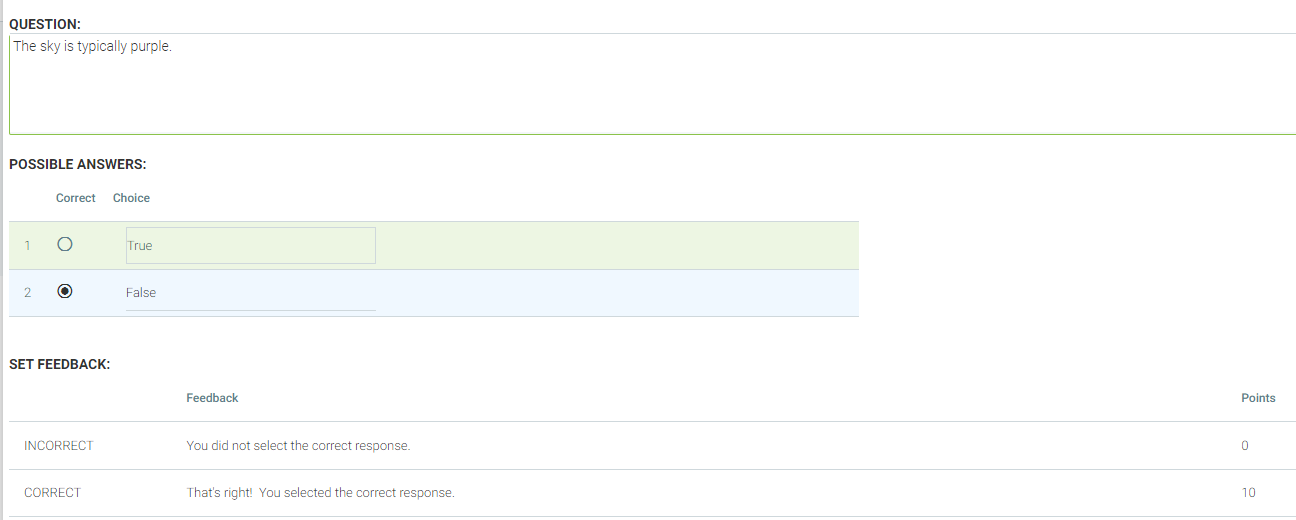
Type the question into the Question text box using the pop-up rich text tools to format the text, add graphics or media, etc.
Select the True or False radio button to designate the correct answer.
If you wish to edit the default feedback text and points value for this question, double-click on the feedback text at the bottom of the screen.
Click the Question Properties button in the top toolbar to add the button label text, set feedback options, and designate a destination URL (if different from the next panel).
Select a topic in the Add to Topic drop-down in the top toolbar to add this panel to an existing topic, or type a new topic name into the New Topic field.
Use a Yes / No panel when the answer to a question has a positive or negative answer.
To add a Yes / No question, go to Resources > Maintain LMS Assessments and search for the quiz you will be editing. Select the quiz and click the Edit button in the toolbar. In the quiz editing screen, select a question group and click the Add Question button from the toolbar.
On the Add Question screen, select Yes / No and click the Add Panel button.
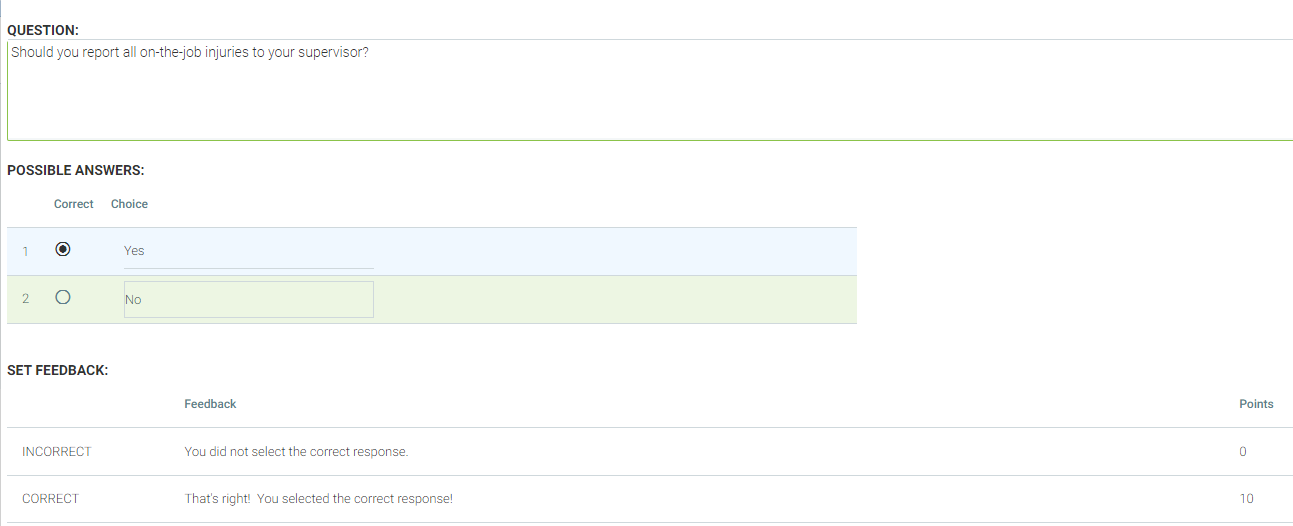
Type the question in the Question text box using the pop-up rich text tools to format the text and add graphics or media, etc. Select the Yes or No radio button to designate the correct answer. You can also change the default Yes or No text, if desired.
Click the Feedback drop-down in the top toolbar and choose By Question or None, depending on whether you wish to provide the user instant feedback after they answer the question or not.
If you wish to edit the default feedback phrases and points value for this question, double-click on the feedback phrases at the bottom of the screen.
Click the Question Properties button in the top toolbar to add the button label text, set feedback options, and designate a destination URL (if different from the next panel).
Select a topic in the Add to Topic drop-down in the top toolbar to add this panel to an existing topic, or type a new topic name into the New Topic field.